A shower bar valve (also called an exposed bar mixer) is a long cylindrical thermostatic valve mounted horizontally on the shower wall. It mixes hot and cold water to deliver a constant, safe shower temperature. At each end of the bar are controls (often cross or lever handles) to adjust flow and temperature. In modern bathrooms, bar valves offer a streamlined look and precise temperature control. Thermostatic bar valves let you set a maximum temperature, preventing sudden scalding or cold bursts.
A chrome wall-mounted bath mixer (shower bar style) adds modern flair and precise control to a bathroom’s plumbing.
Bar valves occupy less space than traditional exposed mixers. They are quick to fit on top of finished wall tiles (no recessing needed), making installation easier and more budget-friendly. By keeping the pipework exposed, they blend function with style – many homeowners choose them for a contemporary look in showers and bath areas.
Role in Modern Bathrooms
In today’s bathroom designs, exposed thermostatic bar valves are very popular. They pair well with shower risers, rain heads, or multi-jet systems. Because of their slim profile, they suit compact wet rooms as easily as luxurious suites. Homeowners and designers alike appreciate how a chrome bar valve can complement tile or glass finishes. At the same time, the thermostatic function ensures safety and comfort; the valve keeps water at a set temperature even if hot or cold supply pressures fluctuate.
Benefits of Using a Shower Bar Valve
- Thermostatic control: Modern bar valves usually includes a thermostat. This holds the water at a steady temperature, preventing scalds if someone flushes a toilet or runs a faucet elsewhere.
- Neat, exposed installation: Because they mount on the wall surface, bar valves avoid complicated in-wall installation. They simply attach to the existing pipe outlets. This means faster fitting and easier maintenance later.
- Space-saving and stylish: Their horizontal, low-profile design takes up less wall space than bulky concealed valves. In contemporary bathrooms, a sleek chrome bar valve can be a design feature in itself.
- Easy operation: Dual handles (or thermostatic handles with safety locks) make it simple to adjust flow and temperature precisely. People of all ages find one-touch or lever handles user-friendly.
- Cost-effective: Generally, exposed bar valves cost less than concealed systems. They don’t require cutting into walls, which saves labor and reduces renovation time.
Why a Secure Fixing Kit Matters
A shower bar valve fixing kit is crucial for a safe and stable installation. This kit includes brackets and plates that anchor the heavy metal valve body firmly to the wall. Without a proper fixing kit, the valve could wobble or strain its pipe connections whenever someone adjusts the handles or touches it. Over time, a loose valve can lead to leaks, cracked tiles, or bursts in the plumbing.
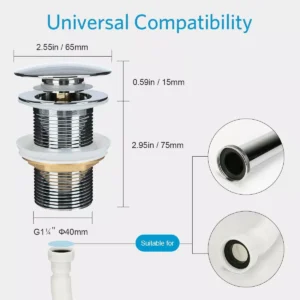
A good fixing kit “has been designed to easily fix a bar shower valve to the wall,” connecting 15 mm pipes solidly to the valve body. Typically, you push the 15 mm hot and cold pipes through holes in the wall, attach the fixings to the tiles or wallboard, then mount the valve onto the brackets. This “rigid fixing” ensures the bar valve stays flush and stable.
Without this support, even slight bumps or the weight of the valve can damage the installation. In short, the fixing kit makes the shower bar valve installation robust. It prevents wobble and makes the whole setup “fast and efficient” to install.
Who Should Use This Kit?
A bar valve fixing kit is useful for DIY homeowners and trade professionals alike. Experienced plumbers will use fixings to ensure a watertight, secure installation for every job. Similarly, a DIY enthusiast installing a new shower valve will benefit from using a fix kit – it makes the process easier and gives confidence that the valve is mounted correctly. Kits usually come with all necessary screws and anchors, so both beginners and pros find them straightforward. Just be sure to confirm that the threads and pipe sizes match your valve (the kit is typically designed for standard 15 mm plumbing outlets).
Professionals appreciate that these kits speed up fitting times. And DIYers get the peace of mind of knowing their new bar valve won’t pull off the wall. In short: anyone fitting an exposed bar mixer or shower valve on a tiled wall should use a quality fixing kit.
A wall-mounted single-lever shower control (left) with secure fixings and a wall bracket. Properly anchoring the valve prevents leaks and movement.
Key Product Features
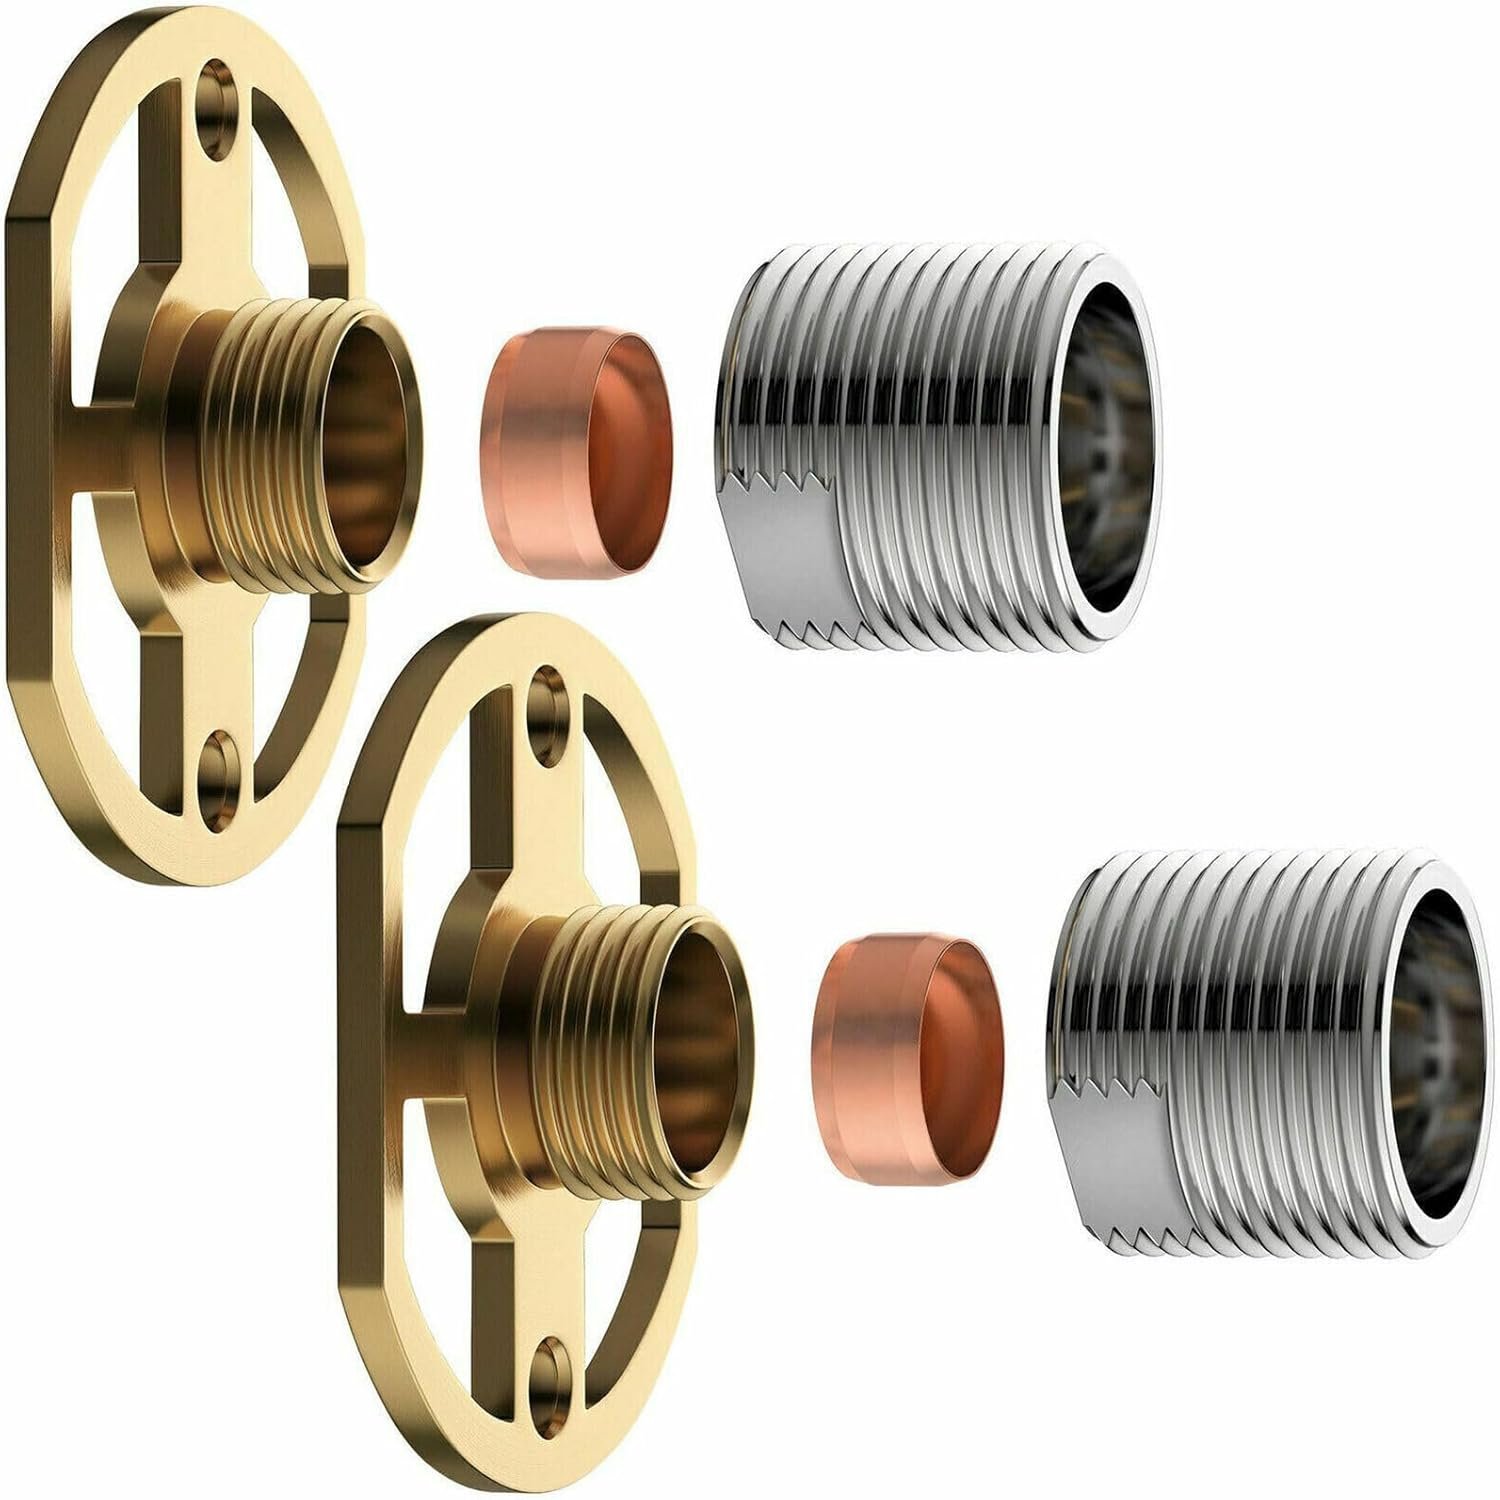
The Shower Bar Valve Fixing Kit (1 Pair, Chrome, BSP wall mounting) has several standout features that installers will notice:
- Solid brass construction: The wall plates and brackets are typically made of durable brass for strength and corrosion resistance. For example, similar kits use a “wall plate [of] brass construction” to ensure long life.
- Chrome finish: A polished chrome coating matches most shower valves and resists tarnish. The kit’s visible parts blend seamlessly with chrome faucets and rails, preserving a sleek bathroom look.
- BSP threaded connectors: “BSP” means British Standard Pipe threading (3/4″) – the common standard for UK plumbing. This ensures compatibility with most bar mixer threads. The kit’s outlets are designed for 3/4″ BSP connections, matching the valve inlets.
- 15 mm compression inlets: Inside the wall, the kit fits onto standard 15 mm copper or plastic pipework. These compression fittings make it easy to connect the household hot/cold pipes to the bar valve without special tools.
- Round shape: The fixing brackets are often round or cylindrical to match valve designs. In many kits, the chrome covers are round for a tidy appearance, hiding the screws.
- Complete set: The product usually includes one pair of brackets and 4 screws per pack, enough to secure both hot and cold sides of the valve. Some kits even come with decorative chrome caps to conceal screws.
In practice, you slide the hot/cold 15 mm pipes through the fixings, anchor the bracket to the tiled wall, then simply screw the bar valve onto the threaded outlets. The kit does “allow the shower valve to be mounted on top” of the fixings for an excellent, thermostatic shower setup.
Installation Tips & What to Watch For
- Turn off water: Always shut off the water supply before beginning. Drain residual water by opening the existing shower taps.
- Measure carefully: A good guideline is to install the valve around 110 cm above the shower floor (adjust for personal reach). Make sure the hot and cold pipes are 150 mm apart (center-to-center) to match most bar valves.
- Mark and drill: Position the fixing brackets and mark drill points on the tile. Use a suitable ceramic drill bit. Insert wall plugs and level the brackets before tightening screws.
- Align the valve: Slide the bar valve onto the threaded fixings, aligning the inlets carefully. Use an adjustable spanner to tighten – but do not over-tighten, as Tapron warns not to damage the valve or pipes. Over-tightening can strip threads or crack fittings.
- Check orientation: Ensure the cold/hot sides are correct (often marked on the valve) before final tightening. The lever or handles should be on the desired left/right side.
- Seal around plates: After securing, apply waterproof silicone sealant around any gaps between the cover plates and the tile to prevent moisture ingress.
- Test for leaks: Turn the water back on and test the valve at full flow. Check all connections (and behind the fixings) for drips. Tighten any loose connections gently as needed.
- Finishing touches: Attach any chrome covers or decorative caps included in the kit for a polished look. Polish off any fingerprints for a showroom finish.
Most importantly, double-check compatibility. These kits are usually designed for exposed bar mixers, so ensure your shower valve is the same type. Confirm the inlet size (15 mm) and thread (BSP) match your valve’s specifications. If in doubt, consult a plumber.
Upgrade Your Shower Today
Ready to give your bathroom the upgrade it deserves? A sturdy shower bar valve fixing kit is a small investment that pays off with years of worry-free performance. By mounting your new thermostatic bar valve correctly, you’ll enjoy precise temperature control and a leak-free installation.
For a reliable fixings kit that fits most exposed shower mixer bars, check out the Shower Bar Valve Fixing Kit (Chrome, BSP, 15mm) at ArdentWholesale. It includes everything needed for a neat installation and comes highly rated for quality. Transform your shower with confidence – purchase the fixing kit here and take the first step towards a better shower experience.